Provided you have the right source, such as EGO’s ARC lithium 56V battery technology, you can outperform petrol-powered multi-tools.
And it also means you can complete garden jobs without having to recharge midway through, depending on the size of the task, of course.
This is thanks to energy efficient design and cooling technology that maximises battery performance.
But just as important as power and the freedom of cordless is versatility and ease of use - how simply does one tool become another?
We’ll demonstrate how with a straightforward explanation of how to attach a line trimmer head and replace with the brush cutter attachment.
How to attach the line trimmer head attachment
First of all, take the necessary safety precautions - wear gloves before handling anything with a blade.
REMEMBER! Before removing an attachment from the power head, stop the motor and remove the battery pack.
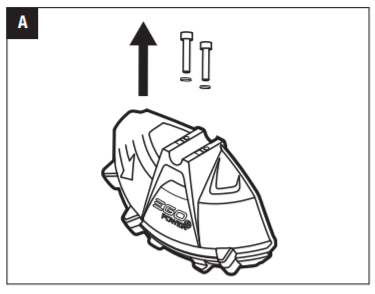
1. Loosen and remove the two screws from the guard (Fig. A).
2. Align the guard mounting holes with the assembly holes.
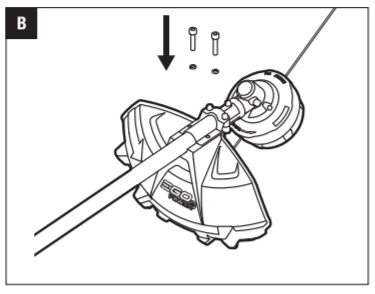
3. Lock the guard onto the shaft base with the two screws, together with two spring washers (Fig. B).
4. Make sure the guard is fixed according to diagram, any reverse fixing will cause danger .
5. Attach correctly assembled attachment to the power head via the coupler device.
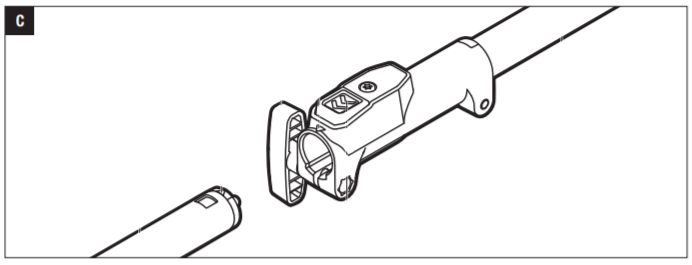
6. Loosen the wing knob and remove the end cap from the attachment.
7. Align the arrow on the attachment shaft with the arrow on the coupler and push the shaft into the coupler until you hear a clear ‘click’ (Fig. C).
8. Pull the attachment shaft to confirm a secure coupling.
9. Tighten the wing knob securely and be sure to check this periodically and each time before using equipment to avoid potential serious injury.
You’re now ready to use your garden multi-tool as a line cutter to remove grass from around fences and decking.
WARNING: When the tool is used as a line trimmer, equipped with a trimmer head, the guard accessory should be mounted onto the guard. Failure to comply could result in an overly long cutting line and motor overload
Then simply loosen the wing knob and hold down the shaft-release button to enable you to pull or twist the attachment shift from the coupler.
How to attach the brush cutter attachment
Again, wearing gloves, follow the simple steps below.
1. Mount the guard by loosening and removing the two screws from the guard (Fig. D).

2. Align the guard mounting holes with the assembly holes and lock the guard onto the shaft base with the two screws and two spring washers (Fig. E).
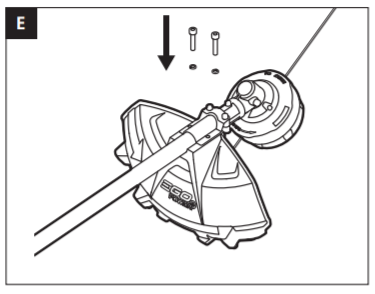
3. Make sure the guard is fixed according to the diagram, any reverse fixing will cause danger.
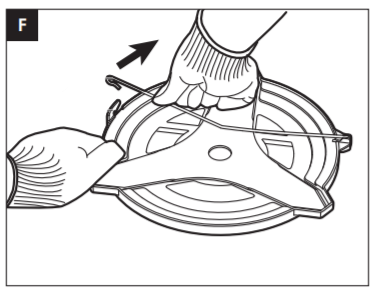
4. Remove the blade from its protective sheath (Fig. F).
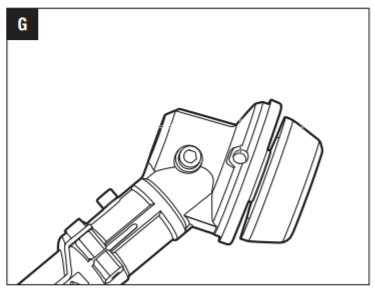
5. Rotate the outer flange to align the slot in the inner flange with the shaft-locking hole in the gear case (Fig. G).
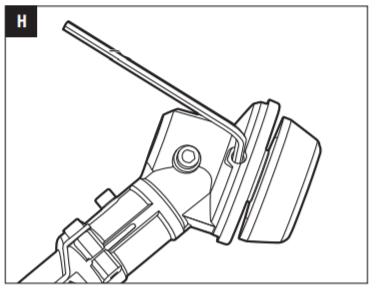
6. Insert the hex wrench provided into the aligned holes to act as a stabilizer (Fig. H).
7. Position the brush cutter head against a solid surface for support and using one hand, hold the shaft while using the multi-function wrench to loosen the nut in the direction of the arrow marked on the outer flange.
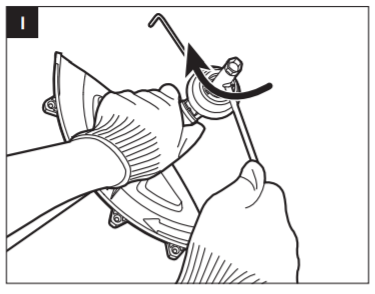
8. Remove the nut and outer flange and save for reassembly (Fig. I).
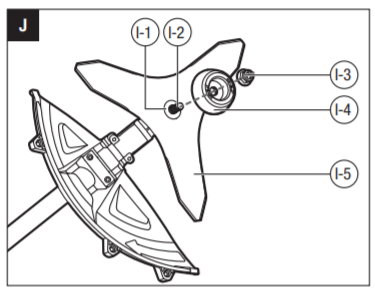
9. Mount the blade onto the motor shaft, with the blade surface flush with the surface of the inner flange bulge.
10. Go on mounting the outer flange and nut (Fig. J) - pre-tighten the nut by hand in a counterclockwise direction.
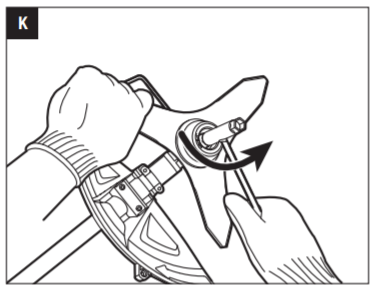
11. Rotate the outer flange to align the slot in the inner flange with the shaft-locking hole in the gear case and insert the hex wrench provided into the aligned holes to act as a stabiliser, as in previous steps.
12. Position the brush cutter head against a solid surface for support and with one hand holding the blade, use your other hand to tighten the nut opposite the direction of the arrow marked on the outer flange, using the multi-function wrench (Fig. K).
13. Attach correctly assembled brush cutter attachment to power head following directions outlined above.
Now you should be ready to use your garden multi-tool for cutting grass, weeds, scrub and other wild growth with a maximum stem diameter of two cm.
For any multi-tool attachment information on assembly, installation, usage and maintenance, always consult the corresponding product manual.
These can be found via our manuals & safety sheets page.
Beyond brush cutting and line trimming
The reason an EGO garden multi-tool saves so much space in your tool shed is by removing the need for separate power tools for several tasks.
As well the line trimmer (STA1500) and brush cutter (BCA1200) attachments highlighted in this article, your multi-tool will also work with the following attachments:
- HTA2000 hedge trimmer attachment
- HTA2000S short hedge trimmer attachment
- PSA1000 pole saw attachment
- CTA9500 cultivator attachment
- BBA2100 bristle brush attachment
- RTA2300 rotocut attachment
- EP7501 extension pole
- EA0800 edger attachment
And of course, all tools feature our exceptional warranty policy and reduced environmental impact compared to petrol equivalents.